Text/HTML

A Complete E2E Metered Billing for Microsoft Azure Stack Hub

Cloud Assert Billing for Azure Stack Hub enables billing and chargeback within Azure Stack portal. It allows you as an administrator to track the resource consumption across Azure Stack and custom services, compare usage vs quota, configure pricing for Azure Stack resources based on usage meters, integrate with external billing systems, and generate invoices automatically based on real-time usages.

Cloud Assert is the only provider of Billing and Commerce platform for Microsoft Azure Stack Hub that has native integration inside Azure Stack Portal UI and Azure Resource Manager API as a Resource Provider. It allows Enterprises, Service Providers, Re-sellers and End Users to view, track and manage their resource consumption and billing from the same single portal with one-pane glass experience.


Cloud Assert Usage and Billing platform is a matured, battle proven solution with many flexible options to customize and suite diverse marketing and sales needs. It provides you the quickest way to offer rich billing solution on top of the Microsoft Azure Stack Hub portal for all your Charge-back, Show-back, Billing and Reporting needs.

Administrator Portal

Usage and Billing solution enables you as a service administrator to define multiple pricing models within Azure Stack Hub for all the available services, resource meters, plans and offers.

  • Set different Pricing Profiles for all the Azure Stack Hub Meters
  • Visibility across Resource Usages and its Costs per subscription
  • Run Promotional Credits in a percentage or a monetary value
  • Extensibility and Flexibility to charge customers based on their specifc needs
Learn More on Admin Features Watch Demo

Customer/ Tenant Portal

Just like Azure public cloud, Tenants can get to see their ongoing usages, pricing and billing information including invoices right within their Azure Stack customer portal at a quick glance.

  • Ability to see their ongoing usages and its associated costs
  • Automatic invoice generation at the end of the billing cycle
  • Pay your bills within the Azure Stack Hub portal
  • Native billing experience just like Azure
Learn more on Tenant Features Watch Demo


Essential Features of the Billing Solution

Azure Stack Hub Billing Resources

Datasheet

Customer case studies on leveraging Cloud Assert Usage and Billing Resource Provider in their Azure Stack Hub journey

Download Datasheet

Azure Marketplace

Explore the seamless native billing experience for Azure Stack Hub and simplify the way to show/ chargeback your customers on real-time

Go to Azure Marketplace


Are you looking for usage and billing Azure Stack Hub

Being an Azure Stack Hub Evangelist | Jayanth Dattatri talks about Cloud Assert Solutions

In this video, Mr. Jayanth, the Senior Principal Engineer Product Technologist for Microsoft Azure Stack Hub, working for Dell Technologies talks about Cloud Assert Billing solution and Dell's association with Cloud Assert.


A Leader in Hybrid Cloud Management Since 2014

Cloud Assert has been trusted by Fortune 100 Companies as a Leader in Hybrid Cloud Management, Cost Management and Billing since 2014.

Cloud Assert work closely with Microsoft teams and our customers in building Hybr VConnect and Billing solutions to complement Microsoft Azure Stack adoption and to deliver a powerful hybrid cloud platform.

We're glad that customers can now take advantage of all the great features of Azure Stack without impacting existing infrastructure investments

Client-1

Ravi C Kolandaiswamy CEO & Founder

Download EBook & Discover Why


Why Choose Cloud Assert to manage your Cloud Infrastructure

Customized Solutions

A concrete roadmap to transform your organization for a cloud orientation.

Friendly Advisory Board members

Cloud Assert team is made of Ex-Microsoft managers and IT leaders across the spectrum

Global Reach

Customers across 30+ Countries that includes Fortune 100 & 500 companies as of today

Recent Blogs

VConnect with VCenter and VM Templates

Setting VConnect with VCenter and VM Templates for Easy Deployment

Author: Ravi C Kolandaiswamy/Friday, April 18, 2014/Categories: Windows Azure Pack, VConnect

Rate this article:
No rating

Preparing VCenter

VConnect can be configured to connect to a VCenter server. VCenter provides many features such as VM Templates, cloning etc. In order to configure VConnect with VCenter, you need to define a datacenter and a cluster in the VCenter. Use VSphere client tools to accomplish the following.

Step 1: Create a Datacenter and a Cluster in that Datacenter:

Step 2: Add desired number of hosts to the cluster                                                                                      


Step 3: Prepare virtual machine base configurations you want to provide to your users.  This involves creating a VM, installing Operating system and necessary software. Once you have a Virtual Machine up to the specification you want your users be able to create, create a Template of that VM as shown below:

Provide a name for the template and finish the creation steps.


Step 4: After the template is created successfully, repeat the same process for other Virtual Machine configurations.


Configure Admin Portal

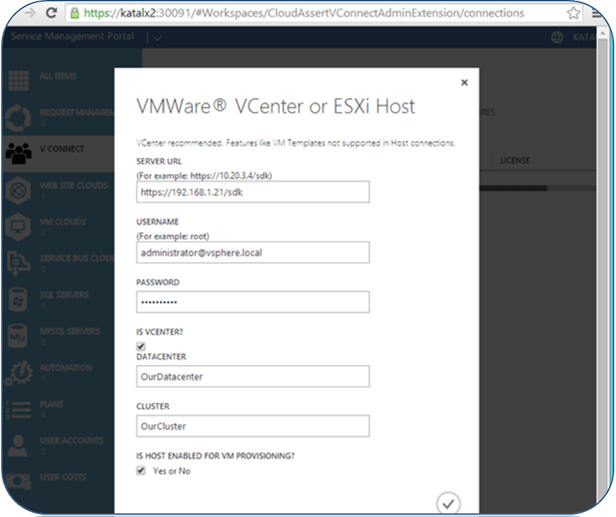
Add VCenter connection

Add a VCenter server connection through VConnect. Specify the Datacenter and Cluster names that exists on the VCenter server.


Add VM Templates

Add entries for each template that exists in VCenter server. For each template entry specify the following options:

Template Name: exactly same as what you have given in VCenter. You can see the templates in the ‘InventoryàVMs and Templates’ view of VSphere client:

Display Name: User friendly name to be displayed for your users.

Description: Description about the template for your users.

Default VM Network: VM Network to which this VM should be connected to. Make sure that this network name is the same as what exists in the VCenter.

Click the tick mark to submit and save the template.


Optionally for Windows templates you can specify the following values:

Default Windows Work Group Name:  Workgroup to which this VM will be configured to join. (Note: Joining a domain is not yet supported)

Run Once Command: Command to be run after the Virtual Machine customization (sysprep). This command can be used to bootstrap batch script that can install additional software or take custom actions.

Default Windows License Key: Optionally you can specify a product key or volume license key that will be applied during the customization process. If the image already contains a license or doesn’t need one, leave this empty.


Click submit and finish adding all the templates needed.      


Creating Virtual Machines in Tenant Portal based on VM Templates


In Tenant Portal, click on the ‘NEW’ à ‘VConnect’àCreate

Select a template you want to create the VM based on:


Provide VM Name, Org Name and admin password for the Virtual Machine and click submit:

Create request gets successfully submitted to VConnect and the entry is shown:

VConnect will provision the VM via VCenter:


VConnect creates a Resource Pool for the tenant subscription and starts deploying the virtual machine based on chosen template:

After the initial creation is over, the Virtual Machine boots up and it will go through several customization process. During this time, user may be able to view the screenshots, however it is important not to power off or do other operations that might affect the customization.


After the customization is completed, users can now connect to the Virtual Machine through Remote Desktop services:

Print

Number of views (10303)/Comments (5)

Let's Work Together

We're Excited to Work Together.

Let’s Talk!

  • *
  • *
  • *